air compressor blog
Add another air tank to air compressor (Step by step guide)
- Feb 16, 2023
Maintaining a steady pressure is one of the keys to driving tools with an air compressor. While small compressors have limited capacity, using an auxiliary air receiver to increase the air volume will keep the pressure more consistent. If you want to add another air receiver tank to your air compressor, this guide will show you how. The process is simple and can be done in an hour or two.
Essential factors when connecting two air compressor tanks
Duty cycle
First of all, treat the duty cycle with caution. It would be a massive disappointment if your air compressor took that long to fill up two air tanks after laboring so hard. This can happen if you don’t give the air compressor enough time to cool down. Make sure the machine is running and maintaining its duty cycle limit.
Air compressors manufacturers set a duty cycle limit between compressor idle time and run time. The compressor can cause severe damage to the system, pump and motor if you are not followed.
Project requirements
Installing a second air tank is not an ideal decision for projects requiring continuous application use. Adding an extra tank would require frequently stopping the compressor from refilling the tank, damaging the project. This configuration would be better suited for intermittent use, where the air tank can top up without damaging the item.
Fill time
You have to be careful because if the pressure is below the value, the compressor will cause the extra time to fill the double tank. This may have occurred due to the increased volume of the additional tank.
How to add an air receiver tank to increase compressor capacity?
If your small air compressor isn’t capable of powering your impact driver or other compressor accessories, you don’t have to spend a fortune purchasing a newer, larger unit. These simple instructions show you how to add another air tank to your existing compressor without using any soldering or tools.
Step 1: Purchase the parts you need
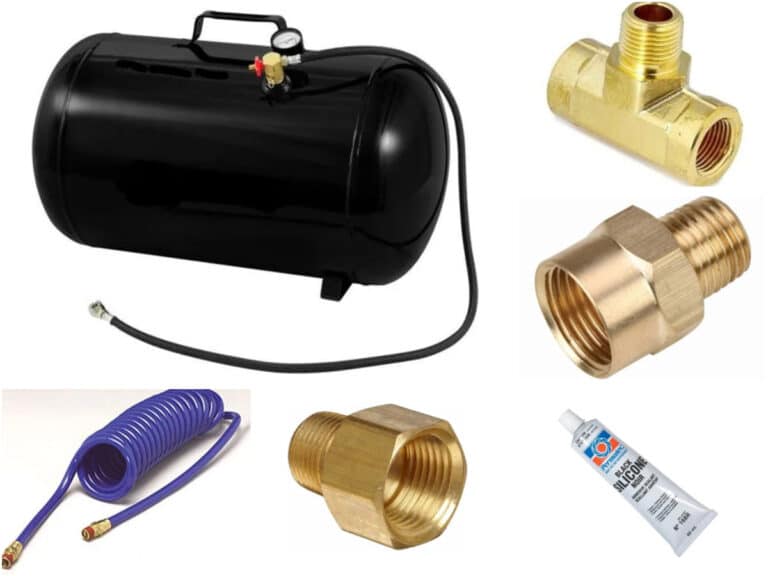
You don’t need much to accomplish this task. A trip to home depot or another hardware store will provide you with everything you need for your project. Here are the compressor accessories you need to purchase:
- Portable air tank with higher capacity than air compressor (i.e. air compressor @ 120 psi requires portable air compressor tank @ 145 psi)
- 3/8” – 1/4” female NPT brass coupler
- 1/2” – 3/8” female NPT brass coupler
- 1/4” NPT brass tee
- RTV silicone adhesive
- New air compressor hose
Step 2: Drain the compressor
The first thing you need to do before you start adding another air tank is to release all the air and remove any condensation from the original air compressor. Regardless, you should do this after every use of the compressor to avoid rot and an air compressor explosion!
Step 3: Remove the safety valve and then install the tee
So now we’re going to dig into the difficult work.
Utilizing an adjustable wrench, remove the safety valve from the air compressor.
With the safety device removed, prepare the brass tee using RTV silicone adhesive around the threads on the male end. Then, using an adjustable wrench, install the tee where you removed the safety valve.
After that, clean any residue from the threaded end of the safety valve and prep it with RTV silicone adhesive. Install the safety valve to the top female end of the brass tee.
Finally, connect the new air compressor hose to the female side at the bottom of the brass tee.
Ensure everything you install is nice and tight, but don’t overtighten.
Step 4: Prepare the new air tank
Once you’ve finished retrofitting your old air compressor, it’s time to start tuning your new air compressor.
- The first step in working on a new air tank is removing the entire assembly from the top. You can keep extra hoses, but we won’t be using any of these for this installation.
- Next, we’ll attach the coupler to where you removed the top assembly.
- Apply RTV adhesive to male threads of 1/2” to 3/8” couplers. Install the coupler to the top of the tank using an impact driver or vital tool and a wrench of your choice. Since the tank will contain significant pressure, you will need to apply approximately 80 ft/lbs of torque on this coupler.
- Then, apply adhesive to the 3/8” – 1/4” reducers and screw in the pair you just installed.
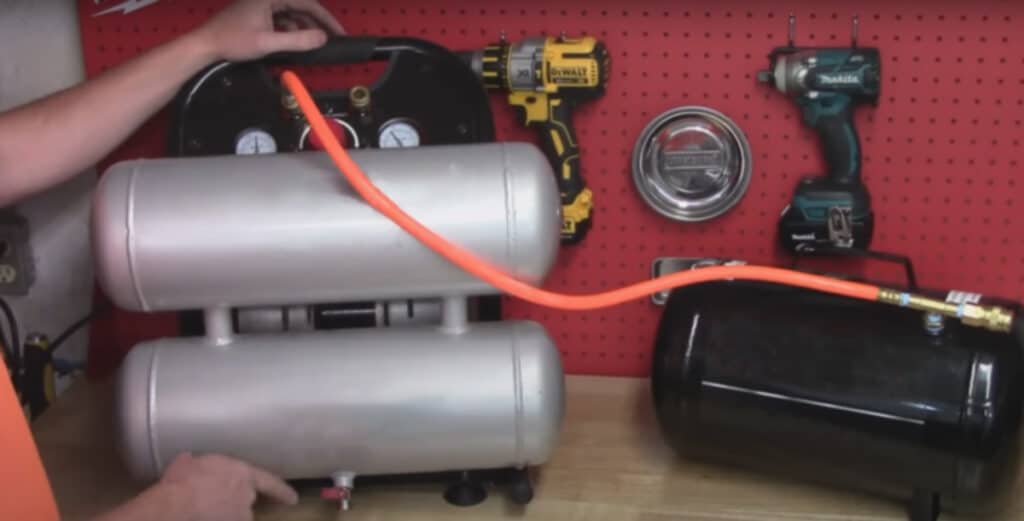
- Finally, attach the other end of the new air compressor hose to the reducer you just added to the new receiver tank.
Step 5: Fill the new tank with air
- Turn the dial to the “off” position. Your air compressor will now shut off the air to the hose but will allow air to pass through the brass tee which you installed and into the new air receiver.
- Once the dial is off, turn on the machine. You’ll notice that all the gauges usually function, and adding the new tank should not affect their performance.
- Keep an eye on the barometer and fill the new cylinder to 145 psi (as an example). When the tank is at your desired capacity, turn off the compressor and turn the dial back to the on position.
Step 6: Check
Start the compressor and let the pressure build up until it stops. Spray soapy water around the fittings on the air tank and check for air bubbles. Tighten any fittings that generate air bubbles until the air bubbles stop. Use your air tools like a compressor; the added capacity will increase available pressure and give you smoother tool operation.
Step 7: Congratulations!
Congratulations! You just finished adding/converting your air compressor! I hope you will find your new toy effective and impressive! With a few simple steps and a minimal number of air compressor parts, you can turn a small, underpowered air compressor into an excellent impact tool and industrial paint sprayer
Benefits of connecting two air compressors
The main advantage of a dual tank air compressor over an air compressor is the greater air storage capacity. It ensures that the motor has a longer run time between cut-off pressure. Therefore, the user can operate the air tool for extended periods. Allowing the compressor pump to fill both tanks results in a greater CFM volume.
Increased CFM
Connecting two air compressor tanks is an excellent solution for increasing the CFM of your compressed air system. In this way, the CFM of the air compressor can be improved. Also, connecting an additional storage tank provides longer cooling times for the air compressor, preventing the compressor system from sucking in more CFM than the pump can produce.
Longer cooling times are essential as greater air volume will keep air tools running for extended periods. Remember that connecting an additional air receiver to the compressor will only increase the CFM of the compressed air system, not the CFM of the air compressor pump. The raw CFM of the air receiver is different from the pump CFM of the compressor.
Reduce the pressure
Adding a second tank is an excellent way to reduce compressor pressure. For example, if an air compressor has a 50% duty cycle, it can run for 4 minutes and must rest for 4 minutes, so it doesn’t get overloaded. Despite the connections, a set of larger air tanks can give you 20 CFM from a 10 CFM-rated air compressor. But this 20CFM will not last long because the air compressor pump cannot maintain this demand for a long time.
Conclusion
These tips can be applied if the project requires longer runs and you don’t have enough money for a new compressor with a larger air tank. Once you learn how to add another air tank, it should not be difficult.
Follow these safety instructions and step-by-step process, and you’ll enjoy its benefits. Finally, maintain the air compressor properly, wear safety equipment, and enjoy safer and high-quality compressed air work.
Frequently Asked Questions about add Air Compressor Tanks
Can an extra oil tank be added to the air compressor?
Of course, connecting two compressor tanks increases storage capacity. It allows you to run your air tools for extended periods between fill-ups.
If you have any enquiries about the BISON air compressor, we would love to hear from you.

